
QUILTING INSTRUCTIONS AND TIPS
April 25, 2024 Strawberry mug rug tutorial - illustrations and instructions
| strawberry_tutorial.docx |
January 24, 2024 Sample needle case pattern and instructions
| slow_stitch_needle_case_pattern_-_dale_box[1910].pdf |
February 22, 2023 Fancy Dancy Quilted Bag by Camilla Bignell
| crazy_quilt_bag.docx |
June 2021 All about Watercolour Quilts and Tip of the Month from Deb Owens
| june_2021_lets_quilt_day.pdf |
May 2021 All about Threads and Tip of the Month from Deb Owens
| may_2021_lets_quilt_day.pdf |
April 2021 Sewing Machine Needles and Tip of the Month from Deb Owens
| march_2021_lets_quilt_day__1_.pdf |
March 2021 Memory Quilts and Tip of the Month from Deb Owens
| march_2021_lets_quilt_day__1_.pdf |
February 2021 Paper Piecing and Tip of the Month from Deb Owens
| feb_2021_email_for_lets_quilt_day.pdf |
January 2021 Scrap Quilt Ideas and Tip of the Month from Deb Owens
| deb_owensscrapquilt_tip.pdf |
OCTOBER 2020 TIP
From Meribeth: 45 mm blades for your rotary cutter can be purchased from Lee Valley for $7.90 each. Item 27K0772, Replacement Blade for Heavy-Duty Rotary Cutter and they also have a nice cutter for $25.50 each and it looks easy to handle. Item 27K0771, Aluminum Rotary Cutter
From Meribeth: 45 mm blades for your rotary cutter can be purchased from Lee Valley for $7.90 each. Item 27K0772, Replacement Blade for Heavy-Duty Rotary Cutter and they also have a nice cutter for $25.50 each and it looks easy to handle. Item 27K0771, Aluminum Rotary Cutter
OFF COURSE Quilting Instructions from Susan McVittie
| susan_mcvittie_quilt_pattern_for_tvqg.pdf |
Susan McVittie shared a quilt pattern with us at the September executive meeting. It is called “Off Course” and if you note on the first page, Susan has circled Under: From Assorted Light Prints, Cut: 160 Rectangles, [Should read 1 ½” x 3 ½” instead of 2 ½” x 3 ½”] Let’s Quilt Day Demonstration: This month’s topic is for Beginners or those who need a refresher on how to figure out Quilt Top Fabric Calculation. Here is a video on You Tube from Professorpincushion.com so you can either check their site directly at: https://www.professorpincushion.com/professorpincushion/quilt-top-fabric-calculation/ or you can check You Tube at: https://www.youtube.com/watch?v=cS3SkT7KFyU
First of all you need to determine what size of quilt you want to make and the person in the video uses a simple block with a border around it. The actual size of the finished block is 10” and the inside square is actually 5 and 1/2” square [finished size is 5” square] and therefore the two left and right borders are rectangles each sized 3” by 5 ½” and the top and bottom borders of the square are rectangles each sized 3” x 10 ½” . If you were making a quilt 50 x 70 inches without a border around it, then you would need to make 35 blocks. You would need to cut: 35 Square Centre Blocks each 5 ½” x 5 ½” 70 Rectangles for Centre Block Sides each 3” x 5 ½” 70 Rectangles for Top and Sides of the Centre Block each 3” x 10 ½” You could make the top of the quilt only in two colours and to determine how much fabric you would need – most cotton fabric is approximately 44” wide and if you cut off the selvages, you could really only count on 40” wide. So if you were doing the quilt in Blue and White as shown in the example, you could figure on possibly getting 7 blocks out of a strip of quilt 44” wide [40/5.5 = 7.2] you would need five strips of 44” wide meaning you would need at least one meter of fabric for the centre blocks. For the sides of the centre blocks, you would again be able to cut 7 blocks 5 ½” wide and because you would need 3” in length, you would need a meter of fabric for the side rectangles. For the top and bottoms, you would be able to cut 13 blocks from a 3” strip of fabric and because the length would be 10 ½” long you would need 2 meters of fabric for the 70 rectangles. I find it helps to use graph paper when figuring out what a block looks like and a calculator also comes in pretty handy. So in summary if you were making a quilt 50 x 70 inches with the pattern above with a white centre and blue borders – you would need one (1) meter of white for the centre squares and three (3) meters of blue for the borders. I hope the above explanations and video links help with determining how much fabric to purchase to make a quilt top.
First of all you need to determine what size of quilt you want to make and the person in the video uses a simple block with a border around it. The actual size of the finished block is 10” and the inside square is actually 5 and 1/2” square [finished size is 5” square] and therefore the two left and right borders are rectangles each sized 3” by 5 ½” and the top and bottom borders of the square are rectangles each sized 3” x 10 ½” . If you were making a quilt 50 x 70 inches without a border around it, then you would need to make 35 blocks. You would need to cut: 35 Square Centre Blocks each 5 ½” x 5 ½” 70 Rectangles for Centre Block Sides each 3” x 5 ½” 70 Rectangles for Top and Sides of the Centre Block each 3” x 10 ½” You could make the top of the quilt only in two colours and to determine how much fabric you would need – most cotton fabric is approximately 44” wide and if you cut off the selvages, you could really only count on 40” wide. So if you were doing the quilt in Blue and White as shown in the example, you could figure on possibly getting 7 blocks out of a strip of quilt 44” wide [40/5.5 = 7.2] you would need five strips of 44” wide meaning you would need at least one meter of fabric for the centre blocks. For the sides of the centre blocks, you would again be able to cut 7 blocks 5 ½” wide and because you would need 3” in length, you would need a meter of fabric for the side rectangles. For the top and bottoms, you would be able to cut 13 blocks from a 3” strip of fabric and because the length would be 10 ½” long you would need 2 meters of fabric for the 70 rectangles. I find it helps to use graph paper when figuring out what a block looks like and a calculator also comes in pretty handy. So in summary if you were making a quilt 50 x 70 inches with the pattern above with a white centre and blue borders – you would need one (1) meter of white for the centre squares and three (3) meters of blue for the borders. I hope the above explanations and video links help with determining how much fabric to purchase to make a quilt top.
Other Initiatives in response to COVID-19 needs
Many members are contributing to the Covid-19 request for medical needs. Please find instructions for the scrub hats and masks below. For updated information or to have questions answered, please contact Jannet Trewartha.
Scrub Hats
Watch video here.
Tape the pages together as directed on the pattern pages. Add one inch across the band (B) along the straight bottom edge and add 1 1/4" at the broad end where it meets the fold. This is needed so the band goes all the way around the top (A). The pattern attached does not reflect these changes.
Cut the pattern out on the heavy solid lines.
If it is a directional pattern face the "Top piece A" pattern piece with the square end facing up toward the direction to the top of the round section.
½" yard of material
½" elastic 5 inches long
After the hat is finished, I wove a piece of ribbon through the band so it could be tied more securely to the head. Not everyone’s head is the same size, no is the length of hair.
- Place pattern pieces onto fabric pieces as directed and cut out.
- Do the following on all 2 short edges of each pattern piece (total 4) by folding edge over 1/4" and pressing with an iron.
- Double fold this over another 1/4" and press again with an iron.
- Now stitch these folds down stitching close to the edges.
- Turn up ¼" all the way along the flat edge of Piece B. Press.
- Turn up another 3/4" all the way along the flat edge of Piece B. Press.
- Mark 3 ½" from both ends of Piece B.
- Attach the elastic to the left side of Piece B where marked after the bottom has been folded, so you are sewing through two pieces of fabric. Keep the elastic in the centre of the casing with a pin. Do a short Zig zag stitch at the 3 ½" mark to secure the elastic. Remove the pin.
- Secure the top of the hat to the band piece, right sides together, by pinning the two pieces together all of the way around. Point pins to the centre of Piece A. Complete a 1/4" inch seam starting at the jutting out corner of Piece A, pulling both fabrics at the same time to get it to fit. End at the other side of the jutting out piece of Piece A.
- Zig zag all the way around unless you have a Serger, then use it.
- Put the elastic in the centre of the other side of the band, cover with the casing. You will be sewing on both sides of the elastic, so you don’t want to catch the elastic. Using a short Zig zag stitch, sew the elastic, through the casing.
- Sew the top edge of the band all of the way around with a straight stitch, don’t catch the elastic.
- Turn the hat inside out. Fold the band to the outside, press. The right side of the fabric will show on the band matching the right side of the fabric of the hat.
- Sew the band on the top all the way around, do not catch the elastic.
- Move fabric on both sides of the elastic over and pull the flap of Piece A through the hole.
- Fold the raw edge up ¼". Press.
- Fold up another 3/4" and press.
- While holding the back piece, stretch the elastic and sew both sides with out catching the elastic.
Face Masks
Our quilt guild president has received notice that home sewn face masks are needed by the Thames Valley health unit.
The masks are not to be made of flannelette, but cotton or poly cotton is fine. Flannel holds moisture. For nurses they can use 4 per shift, so making 8 and putting in a zipper bag, allows them a day of use and a day to wash the dirty ones. Please send a spare zipper bag to hold the dirty ones as they are done their shift they throw the coffee filter out at the hospital and carry the dirty ones home.
These masks can be dropped off at 185 High St. London between 8 a.m. and 10 p.m.
Supplies needed:
Just remember DO NOT use flannel!
Our quilt guild president has received notice that home sewn face masks are needed by the Thames Valley health unit.
The masks are not to be made of flannelette, but cotton or poly cotton is fine. Flannel holds moisture. For nurses they can use 4 per shift, so making 8 and putting in a zipper bag, allows them a day of use and a day to wash the dirty ones. Please send a spare zipper bag to hold the dirty ones as they are done their shift they throw the coffee filter out at the hospital and carry the dirty ones home.
These masks can be dropped off at 185 High St. London between 8 a.m. and 10 p.m.
Supplies needed:
- 2 – 9” x 7” pieces of cotton or cotton/poly
- 2 – 7” pieces of elastic
Just remember DO NOT use flannel!
|
Microwave Bowl - February 12, 2020
|
Cutlery Pouch - February 12, 2020
|
|
| ||||
|
Spray Baste Recipe - Feb 12, 2020
|
Reusable Paper Towels - February 12, 2020
| ||||
Chop Chop Block - January 22, 2020
| chopchopblock.pdf |

Finished Chop Chop Block Quilt
Outreach Baby Quilt
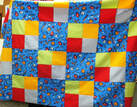
This pattern uses fabric cut
10 1/2" and 5 1/2" square.
Dyeing With Bleach
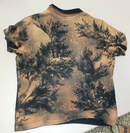 Shirt Dyed with Bleach
Make a Quilt Sleeve
Below is a list of quilting tips and information. When you click on the topic you will receive more information. Topics will be added as information is shared with the web manager.
Make scrappy quilts using tissue paper and scraps. Using long strips of scraps and foundation piece them onto tissue paper (which stabilizes them). Trim them to the same size and assemble into a quilt border or pot holders, etc.
Use your quilting ruler to accurately position fussy cuts on fabric. Put the clear ruler over the character that you are going to fussy cut and mark around roughly the shape with a Sharpie. When you move the ruler to the next character, just line up the rough shape with the character. When you are finished, Goo Gone will take the Sharpie marks off the ruler.
Wash smaller pieces of fabric by hand in a basin and dry them in a salad spinner.
Put a black dot on the end of your spool of thread so you can more easily find the wedge to hold the thread.
Use a plastic toboggan to make a bigger smoother table extension when quilting. The shiny side up allows the quilt to slide easily and allows no height difference to interfere if there is a quarter of an inch difference from machine to table. It can also be used to make different templates.
Use a children's rubber floor mat to put under your machine to help stop the vibration that you get from the table and machine.
- Block of the Month for 2013 -14
- Folding and Storing Quilts
- Instructions for Hot Dog Pillowcases
- Instructions for making Tote Bags from Coffee Bags, Frozen Fruit or Vegetable Bags
- Instructions for making Tote Bags from Tassimo Bags
- Instructions from Nancy Trowbridge for finishing and binding techniques.
Fidget Quilt Instructions:
| fidget_quilt_instructions.pdf |
Instructions for February 2016 projects that were presented at the meeting.